Keycloak - user authentication and authorization in Angular/Spring Boot application

Keycloak - user authentication and authorization in Angular/Spring Boot application
In this article I will demonstrate using a Keycloak server to log into an application on the example of a ready-made project which enables logging in from the browser level.
What is Keycloak?
Keycloak is an open source authentication and authorization server. It can connect to the LDAP/AD or authenticate users via Google, Facebook, etc. It also features an admin console where you can easily configure user permissions and other parameters.
Find out more at www.keycloak.org.
Demo project
The application is available on GitHub. It consists of a back-end part written in Spring Boot (Kotlin) and a front-end application part in Angular 8.
For the purpose of demonstrating the implementation of user authentication with a Keycloak server, let’s secure the endpoints on the backend and the front-end part separately.
Keycloak server
The Keycloak server will be run in Docker. Execute the following command in the main repo directory to run an instance of a Keycloak server on port 8180:
docker run --rm --name keycloak-server -p 8180:8080 \
  -e KEYCLOAK_USER=admin \
  -e KEYCLOAK_PASSWORD=admin \
  -e KEYCLOAK_IMPORT=/realm/realm-export.json \
  -v $(pwd)/realm/:/realm/ \
  jboss/keycloak
The admin console will be available at: 127.0.0.1:8180/auth/admin
Log in to the admin console using the login and password defined in KEYCLOAK_USER and KEYCLOAK_PASSWORD, in this case admin:admin.
Server configuration
Keycloak server configuration deserves a separate article so let’s use a pre-made configuration here. The server configuration export has been located in the demo project’s repository (realm/realm-export.json) and will be loaded at server start.
** The following parameters have been configured: **
- realm
SpringBootAngular - client
SpringBootAngularClient- Access Type:
confidential- when logging in you need to pass the secret configured in SpringBootAngularClient- also available are bearer-only and public options - more about that can be found in the documentation
- Valid Redirect URIs:
*- no limitations for convenience - Web Origins:
*- no limitations for convenience
- Access Type:
user_role- only a user with this role will be able to authorize themselves in the applicationsuserwithuser_role(user:password)user2withoutuser_role(user2:password2)
Backend application
The backend application consists of two controllers:
MainController- exposes the secured endpoints/api/hello- returns theHello from the Backend!string/api/logout- logs the user out of the backend application
KeycloakController- exposes a public endpointapi/keycloak/config- exposes a shared configuration to the frontend
Frontend application
The frontend application consist of three components:
PublicComponent- accessible to everyone without logging inProtectedComponent- protected from unauthorized usersToolbarComponent- menu with buttons for convenience
Authentication on backend
Dependencies
The following dependencies will be used on the backend:
org.keycloak:keycloak-adapter-coresorg.keycloak:keycloak-spring-boot-2-adapterorg.keycloak:keycloak-tomcat-adapter
One dependency containing the following adapters could be used:
org.keycloak:keycloak-spring-boot-2-starter could
However, the latest available version, 4.0.0.Final, uses older adapter versions. One of the changes in newer adapter versions is improved token validation. If a new version of the dependencies with improved adapters comes out in the future, it will be possible to use
it as well.
Configuration
Besides configuring the application port and adapter login level (which lets you see what exactly is going on in the logs), you need to configure keycloak-adapter-core.
Thanks to keycloak-spring-boot-2-adapter everything can be configured in application.yml:
keycloakRequiredUserRole: user_role
keycloak:
  enabled: true
  auth-server-url: http://localhost:8180/auth
  realm: SpringBootAngular
  resource: SpringBootAngularClient
  security-constraints:
    - authRoles:
        - ${keycloakRequiredUserRole}
      securityCollections:
        - name: protected resource
          patterns:
            - /api/*
    - securityCollections:
        - name: public resource
          patterns:
            - /api/keycloak/config
  credentials:
    secret: "<SECRET>"
  realm-key: "<PUBLIC_KEY>"
keycloakRequiredUserRole- since only one role will be used, it will be easier to make it accessible via API (if you want to use more roles, you need to extract them from theauthRoleslist)keycloak.security-constraints- you define endpoint limitations here
You can define paths that are public:
e.g. /api/keycloak/config
and paths which will require permissions
e.g. /api/*
which will require ${keycloakRequiredUserRole} from the user (that is user_role).
Keycloak configuration:
keycloak.enabled- allows you to easily switch off authentication;keycloak.auth-server-url- Keycloak server address;keycloak.realm- realm name;keycloak.resource- name of the client configured for the given realm;keycloak.credentials.secret- secret generated inSpringBootAngularClient, you can find it in admin console (Clients > SpringBootAngularClient > Credentials > Secret);keycloak.realm-key- realm’s public key, you can find it in the admin console (Realm Settings > Keys > Active > RSA > Public Key).
Exposing configuration to frontend
Since the backend and frontend applications are secured separately, and the Keycloak configuration remains the same, the configuration can be exposed from application.yml via API. This way you can avoid duplicating the configuration in the frontend application.
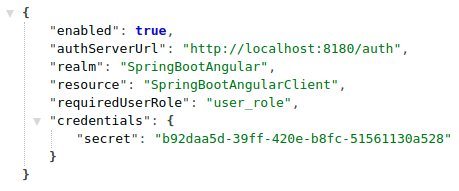
Expose the configuration in KeycloakController at the following address: api/keycloak/config. It will look like that:
{
    "enabled": true,
    "authServerUrl": "http://localhost:8180/auth",
    "realm": "SpringBootAngular",
    "resource": "SpringBootAngularClient",
    "requiredUserRole": "user_role",
    "credentials": {
        "secret": "<SECRET>"
    }
}
Authentication on the frontend
Dependencies
The keycloak-angular library will be used on the frontend link.
Add dependencies in package.json:
"keycloak-angular": "^7.0.1",
"keycloak-js": "^6.0.1"
Downloading configuration from backend
The configuration can be downloaded by calling the backend endpoint.
The first configuration download from KeycloakConfigService will execute a request and the result will be saved. Subsequent downloads will return the saved configuration.
@Injectable({providedIn: 'root'})
export class KeycloakConfigService {
    private config: KeycloakConfig;

    constructor(private http: HttpClient) {
    }

    getConfig(): Observable<KeycloakConfig> {
        if (this.config) {
            return of(this.config);
        } else {
            const configObservable = this.http.get<KeycloakConfig>('/api/keycloak/config');
            configObservable.subscribe(config => this.config = config);
            return configObservable;
        }
    }
}
Configuration
Use the downloaded configuration in the injection token, defining the provider for the APP_INITIALIZER token in app.module.ts:
{
    provide: APP_INITIALIZER,
    useFactory: initializer,
    multi: true,
    deps: [KeycloakService, KeycloakConfigService]
}
Create a function using the KeycloakConfigService that initializes KeycloakService from the keycloak-angular library:
export function initializer(keycloakService: KeycloakService, keycloakConfigService: KeycloakConfigService): () => Promise<boolean> {
    return (): Promise<boolean> => keycloakConfigService.getConfig()
        .pipe(
            filter(config => config.enabled),
            flatMap(config => {
                return keycloakService.init({
                    config: {
                        url: config.authServerUrl,
                        realm: config.realm,
                        clientId: config.resource,
                        credentials: {
                            secret: config.credentials.secret
                        }
                    },
                    initOptions: {
                        onLoad: 'check-sso',
                        checkLoginIframe: false
                    }
                });
            })).toPromise();
}
Securing routes
In order to secure routes, use Angular Route Guard.
Create AppAuthGuard by extending KeycloakAuthGuard and implementing canActivate.
Download the configuration from KeycloakConfigService in the constructor to verify if authentication is enabled (the keycloak.enabled parameter in application.yml), and check if the user has the required role:
@Injectable({
    providedIn: 'root'
})
export class AppAuthGuard extends KeycloakAuthGuard {
    isAuthEnabled: boolean = true;
    requiredUserRole: string;

    constructor(protected router: Router, protected keycloakService: KeycloakService, private keycloakConfigService: KeycloakConfigService) {
        super(router, keycloakService);
        this.keycloakConfigService.getConfig().subscribe(config => {
            this.isAuthEnabled = config.enabled;
            this.requiredUserRole = config.requiredUserRole;
        });
    }

    canActivate(route: ActivatedRouteSnapshot, state: RouterStateSnapshot): Promise<boolean> {
        if (!this.isAuthEnabled) {
            return Promise.resolve(true);
        } else {
            return super.canActivate(route, state) as Promise<boolean>;
        }
    }

    isAccessAllowed(route: ActivatedRouteSnapshot, state: RouterStateSnapshot): Promise<boolean> {
        return new Promise(async (resolve) => {
            if (!this.authenticated) {
                return this.keycloakService.login();
            }
            resolve(this.roles.includes(this.requiredUserRole));
        });
    }
}
Next, use the guard in w app-routing.module.ts to secure the protected route:
const routes: Routes = [
    {
        path: '',
        component: PublicComponent
    },
    {
        path: 'protected',
        component: ProtectedComponent,
        canActivate: [AppAuthGuard]
    }
];
Tests
Running a container
Once you have a Keycloak server running, you can build the application and a Docker image and then run a container.
To do so, first build the application in the main repo directory:
./gradlew build
Next, create a docker image:
docker build -t michuu93/spring-angular-keycloak-demo .
Finally, run the container:
docker run --rm --name spring-angular-keycloak-demo --network host michuu93/spring-angular-keycloak-demo
Since the applications inside the container as well as you operating at the browser level need to have access to the Keycloak server at the same address, a container with the --network host option is run in Docker. Let’s skip the details on how the network works for now.
Thanks to that you don’t have to expose any proxy or replace hosts in the system. This is, however, a simplification made for the purpose of the demo and shouldn’t be used in a production environment.
Verifying authentication procedure
After running the application you can test it in action.
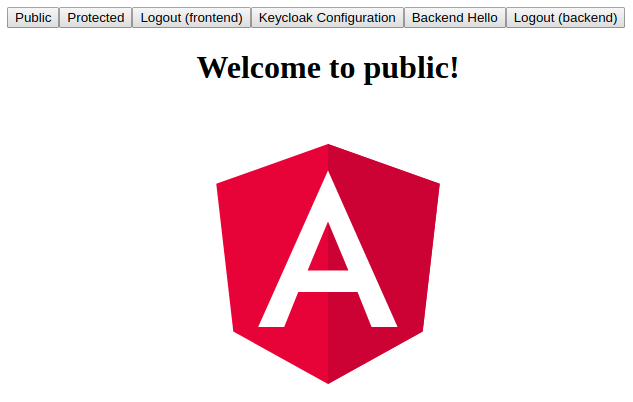
Go to localhost:9082 where you should see the frontend application, specifically ToolbarComponent and PublicComponent:
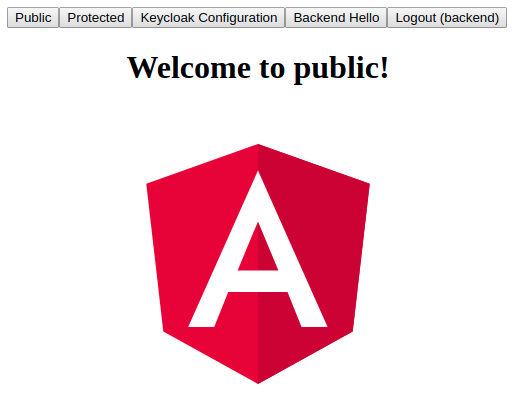
You can use the menu to go to:
Public- unsecured route withPublicComponent;Protected- secured route withProtectedComponent;Keycloak Configuration- unsecured endpoint exposing Keycloak configuration from the backend;Backend Hello- secure endpoint that returnsHello from the Backend!;Logout (backend)- logging out of the backend;Logout (frontend)- button which logs you out of the frontend, available only after logging into the frontend.
To check if you have access to Keycloak Configuration without logging in, execute:
It looks like the public route and API endpoint are working properly.
If you now move to Protected, you will be redirected to Keycloak’s login page:
http://localhost:8180/auth/realms/SpringBootAngular/protocol/openid-connect/auth?client_id=SpringBootAngularClient&redirect_uri=http%3A%2F%2Flocalhost%3A9082%2F%23%2F&state=3e007783-4772-48dd-8b31-4bfe3cc9c42c&response_mode=fragment&response_type=code&scope=openid&nonce=023ab545-32dc-4bdc-9cbf-12cad1d0c944
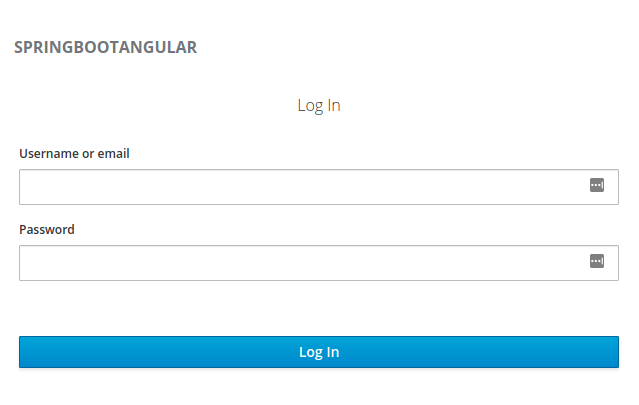
As you can see, the address contains information such as protocol name, realm, client and the address you will be redirected to after logging in.
If you log in with a user that has user_role (user:password), you will be redirected back to the application:
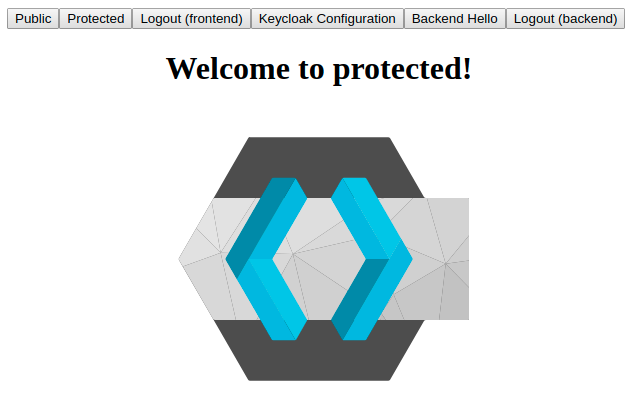
Additionally, you can use the Logout (frontend) button. You’re logged in now, so you can go to Protected:
Backend Hello will work as well:

If you log out of the frontend now - Logout (frontend), the Logout (frontend) button will disappear and you will no longer have access to Protected.
You will still have access to Backend Hello. Only when you log out of the backend - Logout (backend), will you lose access to Backend Hello.
However, if you are a logged in user and you log out of the backend, not the frontend, you will be automatically logged out of the frontend as well.
Why?
The principles of how Keycloak and the tokens (the OpenID Connect standard specifically) work is a separate topic. Due to complex implementation, logging out deserves a separate article, especially when distributed systems with multiple application instances running behind a load balancer are involved.
The demo has a very simple logging out mechanism.
Logging out from the frontend will call the logout method on the keycloak-angular library service:
logout = async (): Promise<void> => await this.keycloakService.logout();
whereas logging out from the backend will call /api/logout, which will result in executing:
fun logout(request: HttpServletRequest, response: HttpServletResponse) {
    request.logout()
    response.sendRedirect("/")
}
on the backend.
Finally, let’s also verify a user without the user_role (user2:password2).
After logging in, you should see the same buttons in the menu as in the case of a user with the required role. This is so because displaying buttons is not dependent on whether the user has the permission to the route but on whether they are logged in:
ngOnInit(): void {
    this.keycloakService.isLoggedIn().then(isLogged => this.isLogged = isLogged);
}
Calling Backend Hello will not be possible either.
Authentication can be quickly turned off in both applications by setting keycloak.enabled in application.yml to false.
It can be useful e.g. in test environments.
Closing remarks
I hope this article has been useful in demonstrating how to integrate an application with a Keycloak server.
Still, this is not the only method of implementation. If the application is supposed to be more flexible, you can use the implementation of the OAuth2 standard using Spring Security. This way you will not be tied to a Keycloak server and in the future you will be able to easily replace it with a different authentication/authorization server.
Keycloak exposes endpoints at which the configuration is available (link).
You can find them in Realm Settings > General > Endpoints. For OpenID Connect in this case it is:
http://127.0.0.1:8180/auth/realms/SpringBootAngular/.well-known/openid-configuration
They can be useful if the application does not use Keycloak adapters to connect to the server.
Also, you don’t have to log in to the application via a browser but you can use Keycloak to authenticate applications between one another, e.g. when you are integrating various modules together. In such a case, the bearer-only option` in the client configuration will be useful.
Similar posts